Schedule
The Schedule shows work orders planned across resources over time.
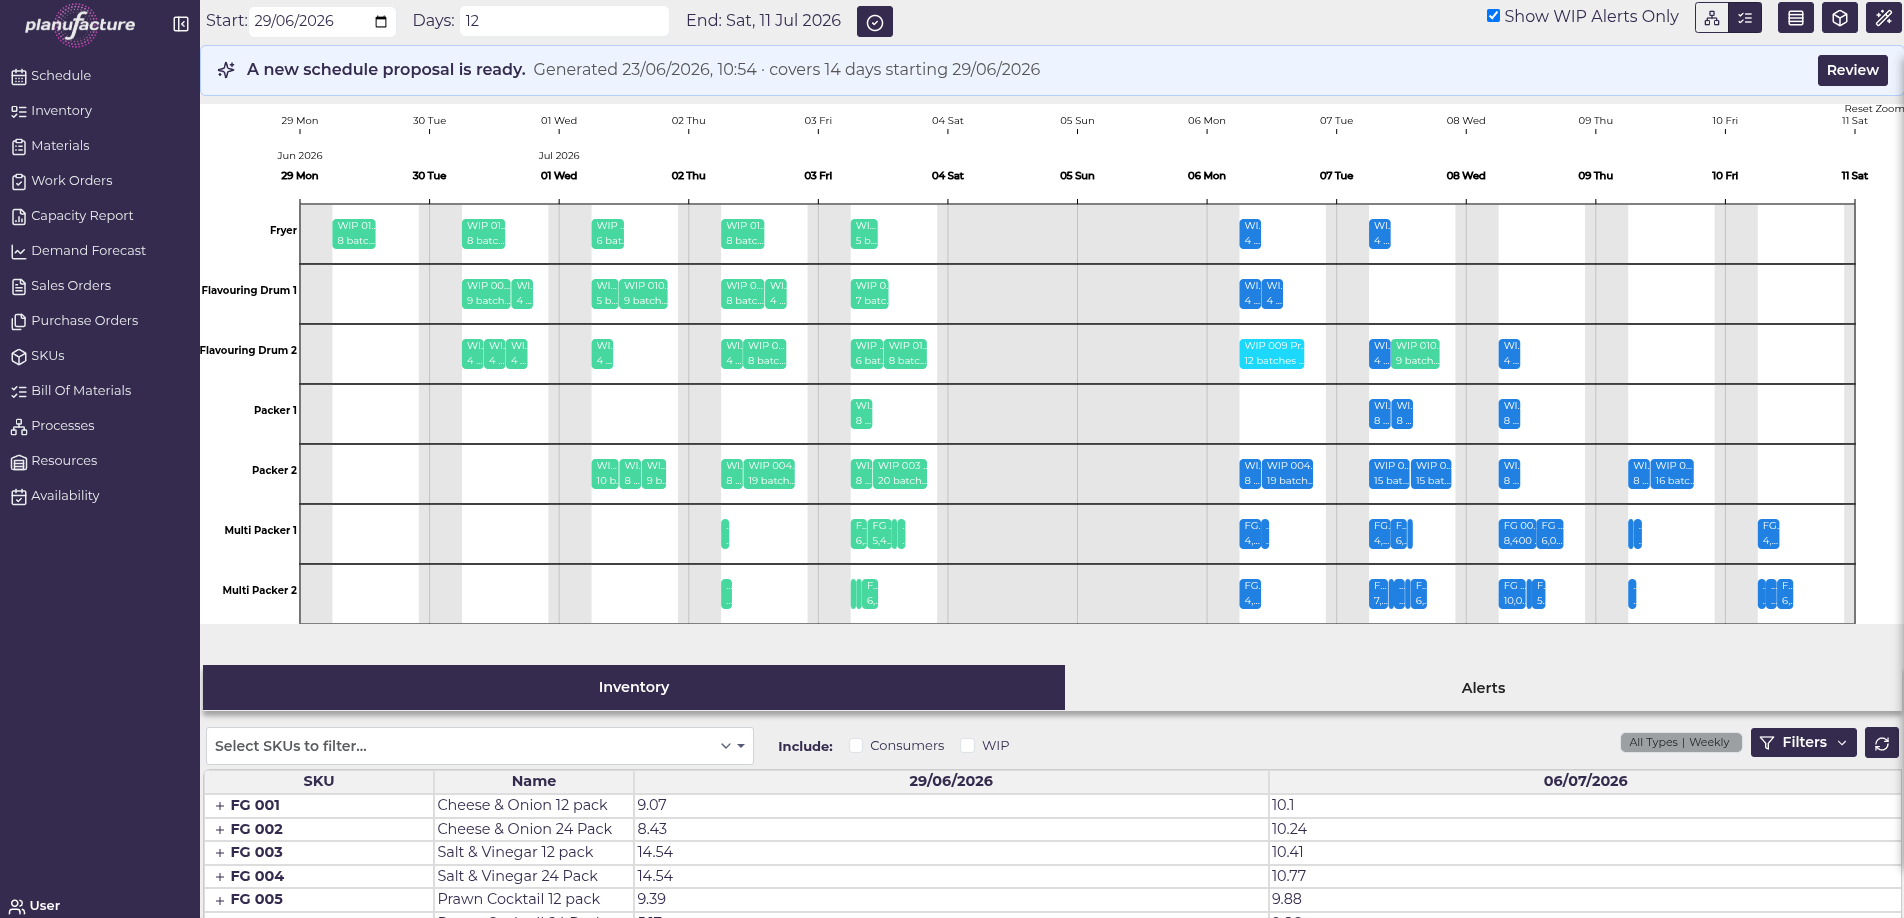
Overview
- Timeline: Configurable date range (start date, number of days, end date)
- Resources: Rows showing each resource
- Work Orders: Blocks on the timeline showing scheduled production
- Inventory Panel: Bottom section showing stock levels and demand for SKUs
Timeline Controls

Date Range Selection
- Start Date: Choose the beginning of the timeline view
- Days: Set number of days to display (e.g., 20, 28 days)
- End Date: Automatically calculated or manually set
- Date picker with calendar interface
View Options
- Show WIP Alerts Only: Checkbox to filter view to work-in-progress alerts
- Filter Lines: Select which resources to display
- Select Lines With Work Orders
- Select All / Deselect All
- Individual line checkboxes
- Color Work Orders: Toggle between coloring by Process or Status
- Reset Zoom: Return to default timeline view
Resources
Your configured resources appear as rows in the schedule. Each resource shows as a horizontal row with work orders scheduled as blocks on the timeline.
Examples of resources might include:
- Mixing equipment (mixers, kettles)
- Processing equipment (ovens, fryers)
- Packaging stations
- Any other equipment configured in your system
Drag-and-Drop Scheduling
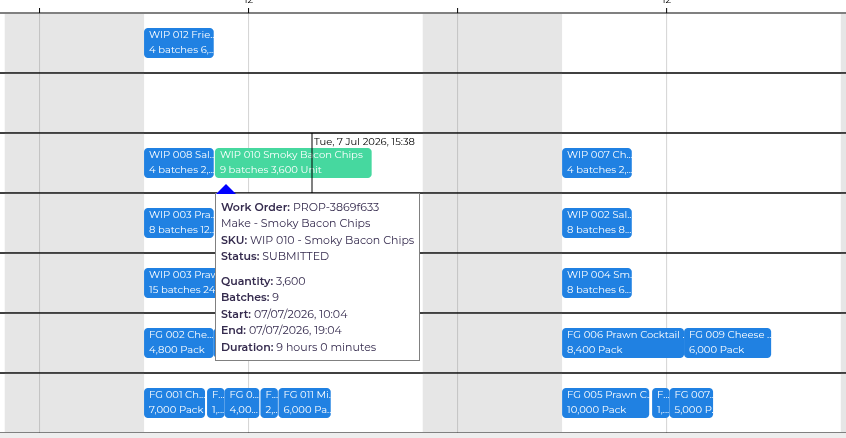
Work orders can be moved on the timeline by dragging:
- Click and hold on a work order block
- Drag to a new time position
- Release to drop the work order in the new location
- System automatically recalculates start/end times and validates constraints
Working with Work Orders
Work Order Blocks on Timeline
Each work order appears as a colored block showing:
- Work Order ID (truncated if long)
- Quantity with unit of measure
- Start/End times displayed on hover or in tooltip
Hover tooltip shows:
- Process name (e.g., "Process Name :: Product Description")
- SKU code and description
- Status (e.g., NEW, IN_PROGRESS, COMPLETED)
- Quantity
- Start time
- End time
- Duration
Work Order Context Menu
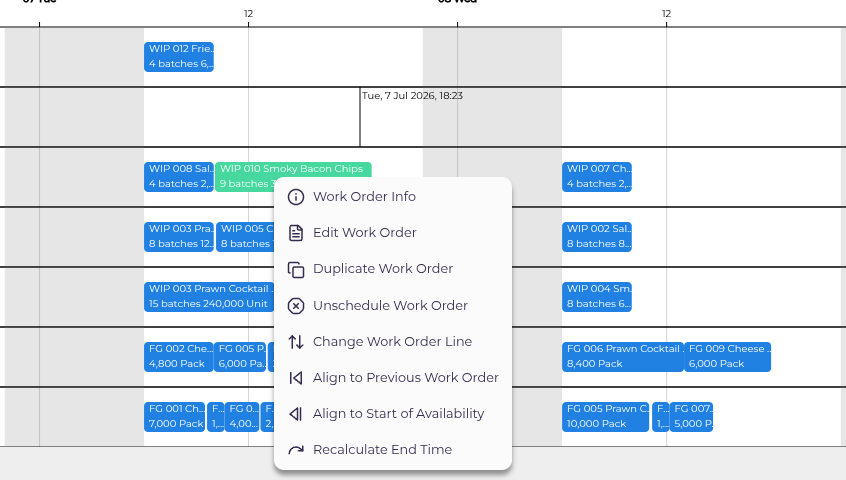
Right-click on a work order block to access:
- Work Order Info: View detailed information
- Edit Start Time/Quantity: Modify timing and quantity
- Duplicate Work Order: Create a copy
- Status actions: Release, lock, or change work order status
- Unschedule Work Order: Remove from timeline
- Change Work Order Line: Move to different resource
- Align to Previous Work Order: Schedule immediately after previous order
- Align to Next Work Order: Schedule immediately before next order
- Align to Start of Availability: Move to earliest available time slot
- Recalculate End Time: Update end time based on current parameters
Work Order Info Dialog
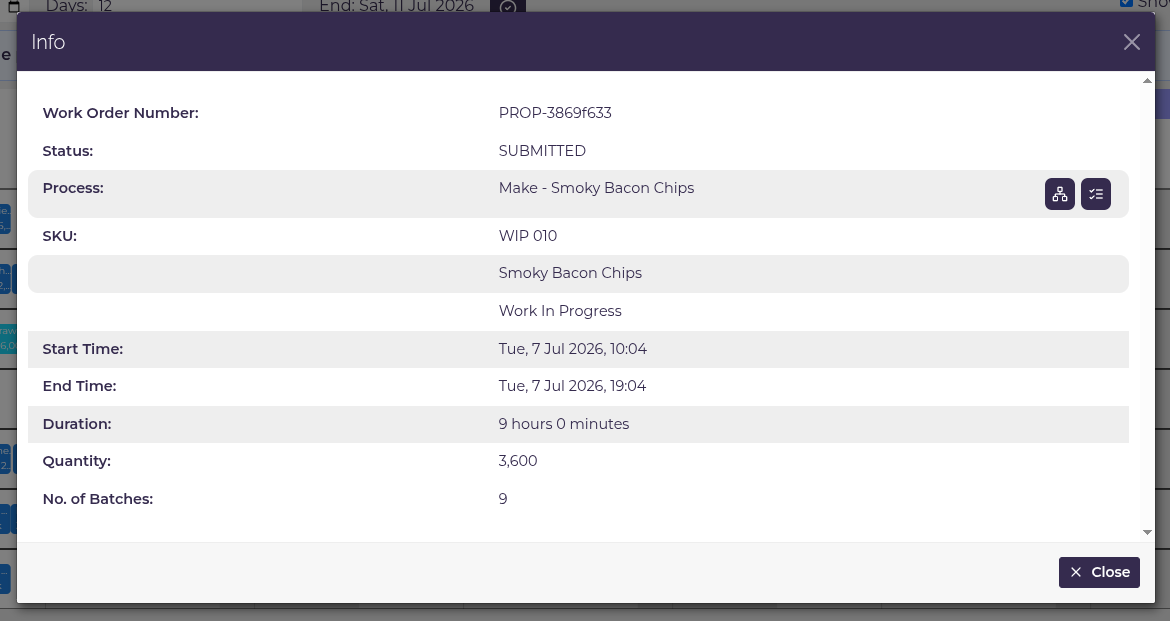
Shows complete work order details:
- Work Order Number
- Status (e.g., NEW) with "Click to Copy" button
- Process: Full process name
- SKU: Code and description
- Product type (e.g., "Finished Good")
- Start Time: Scheduled start date/time
- End Time: Scheduled end date/time
- Duration: Total time (e.g., "2 hours 32 minutes")
- Quantity: Amount to produce
Actions:
- Close: Exit the dialog
Edit Start Time/Quantity Dialog
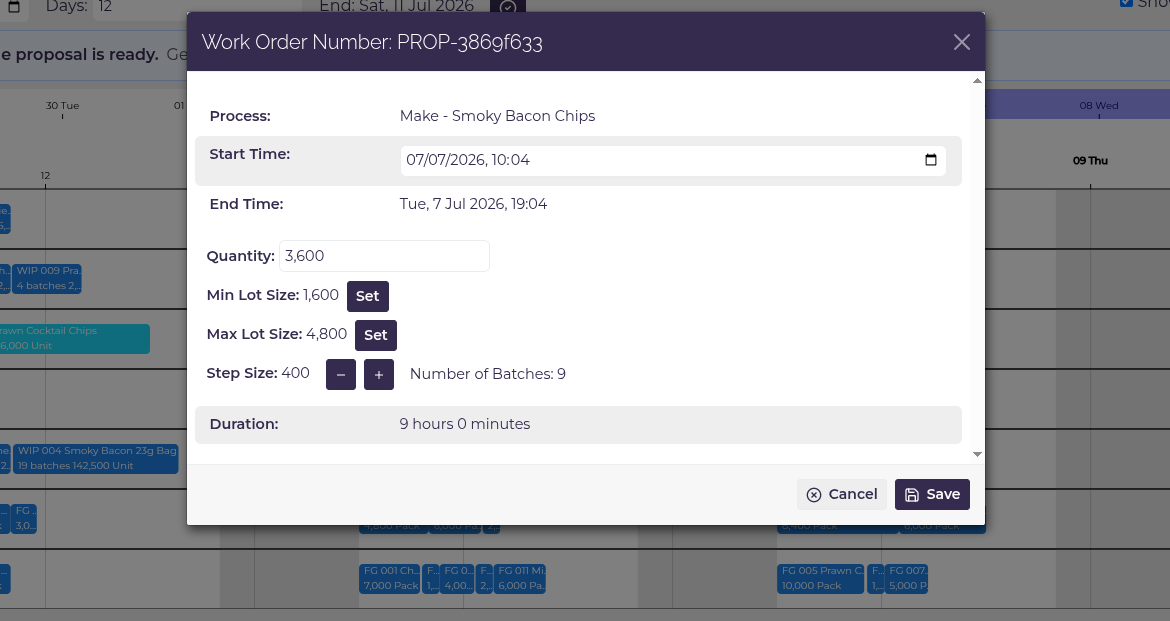
Modify work order parameters:
- Work Order Number (display only)
- NOTE: Warning if start time is before current time
- Process: Display process name
- Start Time: Date/time picker to change start
- End Time: Display calculated end time
- Quantity: Editable quantity field
- Min Lot Size: Display minimum batch size
- Max Lot Size: Display maximum batch size
- Step Size: Display batch increment
- Duration: Display calculated duration
Actions:
- Cancel: Discard changes
- Save: Apply changes to work order
Creating Work Orders from Schedule
Right-click on a resource row to access:
- Release Work Orders: Send planned orders to production
- Add Work Order: Create new work order
- Plan Work Order: Schedule an existing work order
Planning a Work Order
When you select "Plan Work Order":
SKU Details Section:
- SKU code and description displayed
- Process name shown (e.g., "Process Type - Product Name")
- Lines available for this process (checkboxes for compatible lines)
- Schedule From: Date/time picker
- Quantity to produce
- Min Lot Size / Max Lot Size
- Step Size for batching
- Number of Batches calculated
Stock Cover Information:
- Opening Stock
- Production Requirement
- Planned quantity
- Finished Goods Shortage
- Finished Good Requirement
Actions:
- Preview: See how the work order will appear on schedule
- Save: Commit the work order to the schedule
- Close: Cancel without saving
Finding Work Orders
Find SKU in Schedule dialog:
- Search box to filter SKUs
- Shows matching work orders with:
- Work Order ID
- Quantity
- Line assigned
- Start time
- End time
- Duration
- Status
- Un-Highlight / Highlight: Toggle highlighting of selected work orders on timeline
Auto-Scheduling
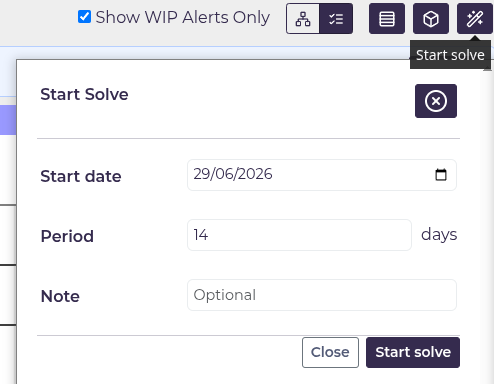
Start Solve dialog:
- Start date: When to begin scheduling
- Period: Number of days to schedule (e.g., 14 days)
- Note: Optional description
- Start solve: Run the auto-scheduler
- Close: Cancel
The solver plans work orders across available lines based on constraints and optimisation rules.
Inventory Panel
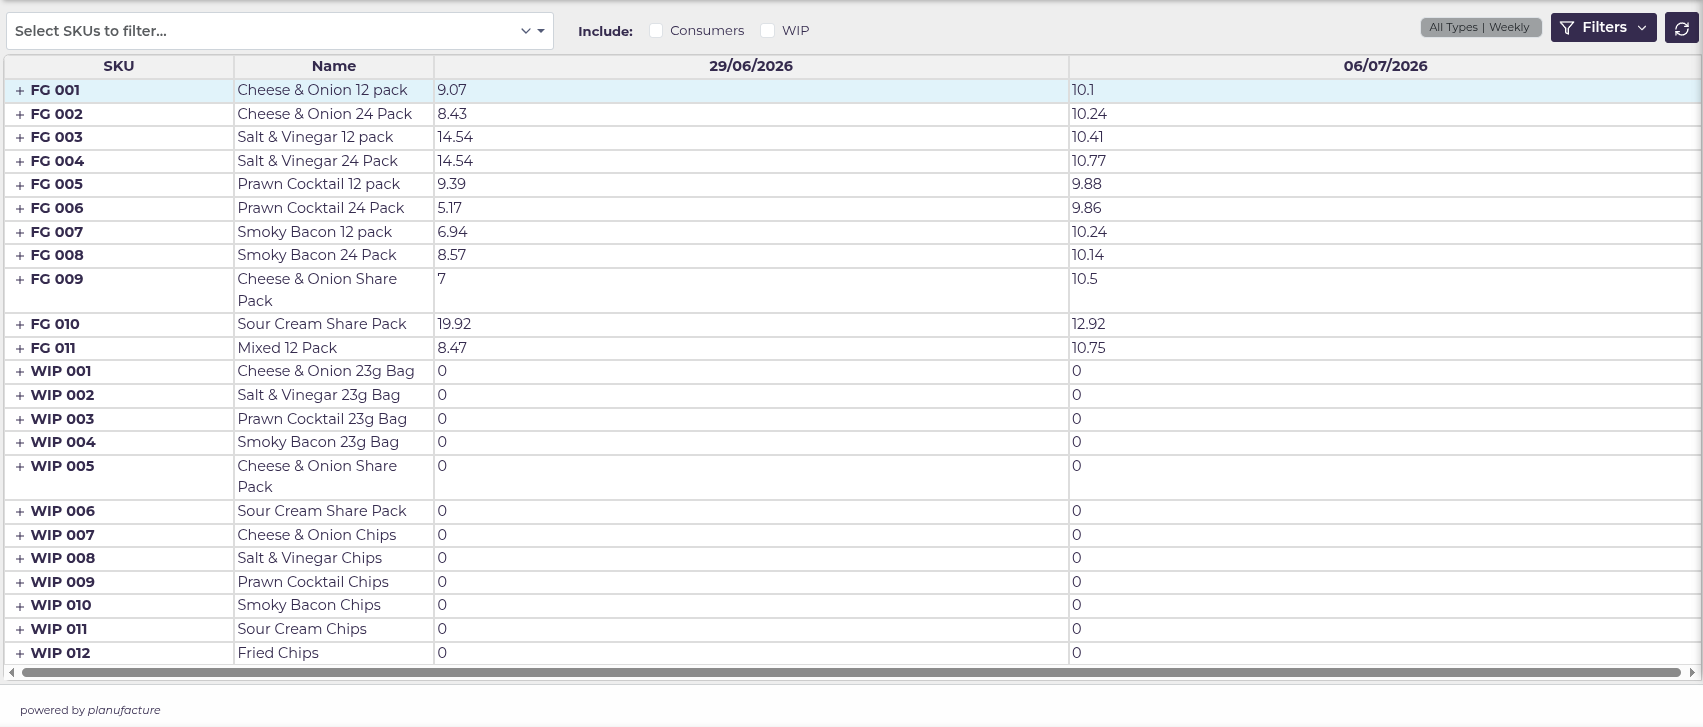
The bottom section shows inventory status:
SKU Filtering
- Select SKUs to filter: Dropdown with search
- Search by SKU code or product name
- Shows SKU code and full product description
Inventory Columns
- SKU: Product code
- Name: Product description
- Date columns: Stock projections by date (e.g., 29/06/2026)
- Include: Checkbox for Consumers (filter option)
Inventory Details per SKU
- Projected Opening Stock
- Demand
- Planned (production)
- Projected Closing Stock
- Days Cover
- Min Days Cover
Actions from Inventory
Right-click on a SKU row:
- Add Work Order: Create new production order
- Plan Work Order: Schedule production for this SKU
Common Workflows
Rescheduling with Drag-and-Drop
- Locate work order block on timeline
- Click and hold on the work order
- Drag to new time or different line
- Release to drop
- System recalculates and validates
Quick Adjustments via Context Menu
- Right-click on work order block
- Select "Edit Start Time/Quantity"
- Modify start time or quantity
- Click Save
- End time automatically recalculates
Planning Production from Low Stock
- Review Inventory panel for low Days Cover
- Right-click on SKU with shortage
- Select "Plan Work Order"
- Choose line, quantity, and start date
- Preview and Save
Aligning Work Orders
- Right-click on work order
- Select alignment option:
- Align to Previous Work Order (minimize gaps)
- Align to Next Work Order (pack schedule)
- Align to Start of Availability (earliest possible)
- Work order moves automatically
Filtering the View
- Click filter icon or use Filter Lines
- Select specific resources to display
- Use "Select Lines With Work Orders" to focus on active lines
- Apply filters
Changing Timeline View
- Adjust Start date
- Change Days to show more/less time
- Use date picker for End date
- Click refresh to update view
Tips
- Drag-and-drop is the fastest way to reschedule work orders
- Use Color Work Orders by Status to quickly identify work order states
- Lock Work Order prevents accidental changes to critical orders
- Duplicate Work Order quickly creates repeat production runs
- Show WIP Alerts Only helps focus on in-progress issues
- Find SKU in Schedule quickly locates specific products on the timeline
- Check Inventory panel for stock shortages before planning
- Use Align to Previous/Next to pack the schedule and minimize idle time